The gap threshold — what size gap lets a Norway rat through
Norway rats can compress their bodies through a gap approximately 3/4 inch (20mm) in diameter — roughly the size of a quarter. This is smaller than most homeowners expect. A gap that looks "too small for a rat" often isn't. The way to think about crawl-space exclusion is not "is this gap large?" but "is this gap larger than 3/4 inch?" — because if it is, it's a potential Norway rat entry.
House mice have a lower threshold still: approximately 6mm (1/4 inch) — the diameter of a pencil. Any crawl-space gap that passes a pencil passes a mouse. This is why the exclusion material standard for crawl-space vents is 1/4-inch mesh: it's below the mouse threshold, which automatically handles both rats and mice.
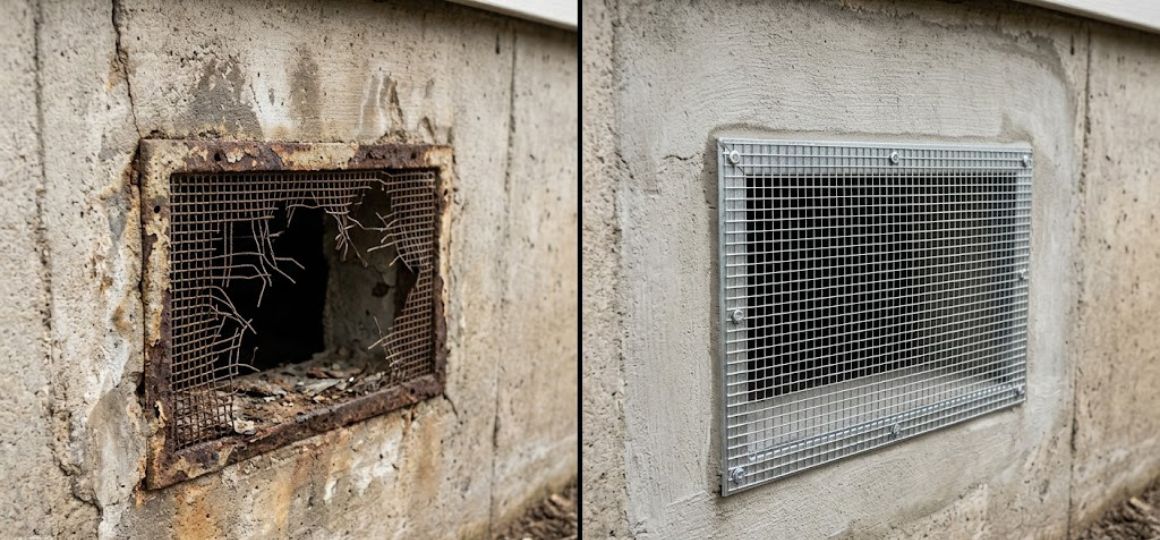
Foundation block vents in Greensboro's older homes are typically 8×16-inch openings covered by screen. When that screen fails — corrodes, pulls away from the frame, gets pushed in — you have an 8×16-inch opening with nothing blocking entry. The relevant question isn't gap size at that point; it's whether the screen is intact. If it isn't, it needs to be replaced regardless of what the remaining screen looks like.
What doesn't work — the materials that fail within a season
Expanding foam alone — the most common DIY choice and the most common failure. Rodents chew through standard polyurethane expanding foam within days to weeks. The foam compresses when bitten and provides no resistance. Even "pest-stop" formulations of foam that contain capsaicin or other deterrents are chewed through once the deterrent dissipates. Foam has one legitimate use in crawl-space exclusion: as a backing material packed behind rodent-grade mesh, not as the primary seal.
Standard aluminum window screen — the original material in most Greensboro crawl-space vents, and the material that fails. Standard aluminum insect screen has mesh openings larger than 1/4 inch and can be chewed through by rats and mice. It also corrodes rapidly in Greensboro's humid conditions. If your crawl-space vents have aluminum window screen, they need to be replaced.
Hardware cloth with staple attachment only — even correctly-sized 1/4-inch hardware cloth will fail if it's secured only with staples driven into aging wood. Staples pull out of soft, weathered sill lumber within 1–2 seasons. The hardware cloth panel then separates from the frame and the gap reopens.
What does work — material specs for each crawl-space entry type
Foundation vent screens: 19-gauge welded wire mesh, 1/4-inch opening, galvanized or stainless steel (stainless preferred in high-moisture crawl spaces where galvanized corrodes faster). The mesh must be in a frame that's secured to the surrounding structural framing — not just to the existing vent cover — with galvanized screws or bolts at 6-inch intervals. The frame provides the load-bearing resistance against rodent pressure; the mesh provides the exclusion.
Pipe penetrations through foundation walls: Copper mesh (not steel wool, which corrodes and compresses) packed tightly into the gap around the pipe. Copper mesh maintains its shape, doesn't corrode, and rats don't chew through it effectively. After packing the copper mesh, apply a rodent-appropriate sealant over it — caulk rated for exterior masonry use. The sealant isn't what stops the rat; the copper mesh is. The sealant fills the residual gap and protects the mesh from debris accumulation.
Sill-plate gaps: The junction between the wood sill plate and the concrete or block foundation. These gaps widen over time as wood moves — they may be hairline in some places and 1/2 inch in others on the same home. Copper mesh packed into accessible gaps, followed by foam backer rod and exterior-grade sealant. For larger gaps, rigid material backing (galvanized flashing) before the mesh and sealant.
Crawl-space access door: Heavy-gauge aluminum brush sweep at the door threshold — not the hollow rubber bulb sweeps that compress under light pressure. Hardware-cloth frame at any ventilated panel in the access door itself.
The sequencing rule — why you seal last, not first
The most consequential error in DIY crawl-space exclusion is sealing before the existing population is cleared. If Norway rats are currently in the crawl space when you seal the entry points, you've sealed them in. Sealed rodents that can't exit die in the crawl space, decompose, and produce weeks of odor that migrates into the living space above. The resulting cleanup is more expensive and more disruptive than addressing the population before sealing.
The correct sequence: confirm whether there's an active population first. Signs of active crawl-space infestation include fresh droppings (dark and moist, not gray and crumbling), musky odor from the access hatch, and scratching sounds below floor level. If those signs are present, trap the population before sealing — snap traps in the crawl space at confirmed travel paths, pre-baited for 3–5 days before activation to overcome Norway rat neophobia. Once trap activity has stopped for 5 or more days, the population is likely cleared and sealing can proceed.
When professional exclusion is worth the cost versus DIY
Foundation vent screen replacement with hardware cloth is a straightforward DIY task for an accessible, exterior-mounted vent with a simple frame. Pipe penetrations at accessible exterior walls are manageable with copper mesh and appropriate sealant. These are the two DIY-accessible interventions that cover the most common entry points.
The entry points that benefit from professional assessment are the ones that require knowing where to look: sill-plate gaps at interior corners of the crawl space that are only visible from inside, secondary pipe penetrations at utility chases that don't show on the exterior, and the subtle separations at the wood-frame junction where post-war additions meet the original foundation. These gaps are the ones that keep producing recurring infestations after a homeowner has addressed the obvious vents and thinks the job is done.
For Greensboro homes in the high-pressure crawl-space corridors — Aycock, Westerwood, College Hill, Kirkwood, Latham Park — a professional exclusion audit is the investment that converts a recurring annual infestation into a solved problem. Call (844) 635-0403 for a free crawl-space assessment.
The actual tool list for crawl-space sealing — what to buy before you start
Before getting under the house, having the right tools and materials staged saves significant time and prevents the partial-fix problem (gap addressed inadequately because the right material wasn't on hand). For a typical Greensboro crawl-space sealing job, the complete kit:
Personal protection. Tyvek coveralls ($15–$25), N95 or better respirator ($8–$30 depending on grade), nitrile gloves ($10), knee pads ($15–$30), headlamp with backup ($20–$40), safety glasses ($5). The respiratory protection is non-negotiable — rodent droppings, mold spores, and fiberglass particulate all become inhalation hazards in disturbed crawl space environments. Total kit cost: $75–$150.
Cutting tools. Aviation snips (for hardware cloth) — about $20, get the right-cut or left-cut snip that matches your dominant hand. Heavy-duty utility knife with replacement blades. A small drill/driver with #2 Phillips and 1/4-inch hex bits — exterior screws drive into sill plate wood and into masonry-anchor inserts. Cordless is essential for working in a crawl space without trip hazards. Total: $80–$200 if you don't already have these.
Sealing materials. 19-gauge 1/4-inch hardware cloth — buy a 3-foot by 25-foot roll ($35–$45), enough for a full home's foundation vents. Copper mesh wool ($15 per pound, you'll typically use less than a pound per home). Polyurethane sealant (Quad Max or equivalent, $7–$10 per tube — buy 3 tubes). Galvanized #8 exterior screws ($8 for a contractor pack). For masonry attachment: hammer drill and Tapcon screws if the foundation requires it ($35–$80 for drill rental or purchase, $12 for Tapcon pack). Total: $90–$160.
The investment in proper materials is $300–$500 once. The same materials work for multiple seasonal touch-ups across years. Compared to the cost of having a professional crew do the same work ($600–$1,500 for a typical residential job), DIY is meaningfully cheaper if you have the time, physical ability, and willingness to crawl in confined spaces. We're honest that it isn't for everyone.
Common DIY mistakes that create new problems — based on calls we get afterward
Roughly 20% of our crawl-space exclusion calls in Greensboro come from homeowners who attempted DIY sealing first and either failed or created new issues. The five patterns that come up most often:
Foam-only sealing of pipe penetrations. Expanding spray foam alone doesn't stop rats — they chew through it within days. The correct approach is to stuff copper mesh wool into the gap first, then seal with foam or sealant on top. The mesh provides the actual barrier; the foam holds it in place and finishes the seal. DIY work that uses foam alone has typically failed within 30 days.
Stapling hardware cloth to old sill plate. Staples driven into aged sill-plate wood (especially the soft, moisture-degraded wood common in older Greensboro homes) pull out within one or two seasons. The mesh patch detaches; the gap reopens. The correct approach is galvanized screws driven through the mesh and into solid framing — typically the rim joist or band joist behind the sill plate — every 6 inches along the mesh perimeter.
Sealing the wrong gap and missing the real one. Homeowners often address the visually obvious gap (the missing vent screen they can see from outside) and miss the less-obvious entry path that's actually being used (the pipe penetration on the opposite side, the soffit-return gap that's harder to see). Norway rats follow specific travel routes; sealing a non-route entry point achieves nothing if the actual route remains open. A systematic walk-around looking for grease trails, droppings, and gnaw marks identifies which gaps the rats are actually using.
Sealing during active infestation. Already discussed at length in the sequencing rule section above — sealing entry points before confirming population clearance traps rodents inside. The most common DIY mistake we see, and the source of the worst follow-up problems (dead rodents in walls, secondary odor issues, much higher total cost than if the work had been done in correct sequence).
Using galvanized hardware cloth on a heritage home. For homeowners in Irving Park, Fisher Park, Aycock, and other older Greensboro neighborhoods, standard galvanized hardware cloth installed with visible screws on architecturally significant elements (original soffits, decorative wood vent frames, period brickwork) can permanently damage character-defining features. Heritage-aware installation uses stainless mesh in custom-fitted frames and no-drill attachment methods. The material cost is 2–3x higher; the alternative is irreversible damage to features the home's resale value depends on.
Related services
For homeowners wanting professional crawl-space work rather than DIY, these are the relevant service categories:
Rodent problem in Greensboro or Guilford County?
Free inspection, same-day dispatch available, written quote before any work starts. Licensed in North Carolina. Open 24/7.
Call (844) 635-0403